How to create a custom BizTalk 2010 functoid using the Item Class Template for Visual Studio 2010
July 5, 2012 at 11:14 am 2 comments
A week ago BizTalk MVP Sandro Pereira announced the release of a new Functoid Class item template for Visual Studio 2010 that allows you to create new functoids for BizTalk Server 2010 without having to code the entire class.
In this post I will show you how to use the template to easily create a new Functoid and test it in BizTalk 2010.
Item Template Installation
First you need to download the class item template from the TechNet Gallery:
Once the .zip file is downloaded you should copy it to C:\Users\UserName\Documents\Visual Studio 2010\Templates\ItemTemplates\VisualC#
Class Library Project Creation
Now that the item template file is in place you can proceed to create a new class library project in Visual Studio 2010. This project will be used to hold the functoid classes to be constructed.
In the new project select Add – New Item…
In the Add New Item window select Custom Functoid Class, enter a proper name and click Add
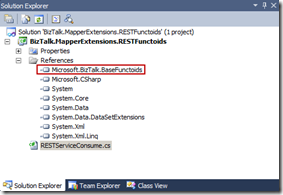
The templeates creates a new class and adds a reference to the Microsoft.BizTalk.BaseFunctoids assembly
The new class contains of the elements needed to implement the new Functoid with comments explaining the purpose of each section. I’ll discuss it in a few moments.
At this point you only need two more things to end the initial setup of your project:
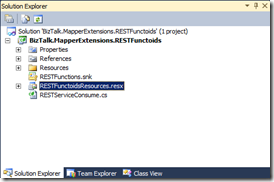
1) A folder to hold your functoid icons
2) A resource file in which define certain values required for the functoid configuration.
Now you are ready to start modifying the functoid class with the proper values. The Item Template makes the process so easy and quick that you could develop your first functoid in just minutes.
First you need to define an Id for the functoid. Certain functoid IDs are reserved by standard/inbuilt Mapper functoids. Usually, the standard Mapper functoids use the IDs from 1 to 10000. While creating custom functoids, do not use the functoid IDs less than 10000.
- //ID for this functoid
- this.ID = 10001;
Next you need to type the resource assembly name, it is composed by the project namespace + the resource file internal class name (it should be the same as the resource file name)
- // resource assembly must be ProjectName.ResourceName if building with VS.Net
- SetupResourceAssembly("BizTalk.MapperExtensions.RESTFunctoids.RESTFunctoidsResources", Assembly.GetExecutingAssembly());
Next you need to define the following resources:
1) Name. Name of the functoid to be displayed in the toolbox, grid and properties window.
2) Tooltip. Tooltip of the functoid.
3) Description. Description of the functoid to be displayed in the toolbox, configuration and properties windows.
4) Bitmap file for the functoid. A string key name associated with the resource in the resource file. This bitmap must be a Windows Bitmap file measuring 16 x16 pixels and 24 bit color. You can use GIMP to create a file with those characteristics.
- //Setup the Name, ToolTip, Help Description, and the Bitmap for this functoid
- SetName("IDS_RESTSERVICECONSUME_NAME");
- SetTooltip("IDS_RESTSERVICECONSUME_TOOLTIP");
- SetDescription("IDS_RESTSERVICECONSUME_DESCRIPTION");
- SetBitmap("IDS_RESTSERVICECONSUME_BITMAP");
The name, tooltip and description values are added to the resource file as strings.
To add the bitmap file simply drag it from its folder and into the Images section, then enter the same name you defined in the class file.
Next a category must defined for the functoid. This value describes under which tab the functoid will be placed upon insertion in the toolbox. You can find more information about the FunctoidCategory enumeration here.
- //category for this functoid. This functoid goes under the String Functoid Tab in the
- this.Category = FunctoidCategory.None;
Once the functoid category has been defined you will proceed to define values related to the functoid inputs, outputs and operation.
The first values to define in this section are the minimum and maximum quantity of parameters supported by the functoid.
- // Set the limits for the number of input parameters. This example: 4 parameters
- this.SetMinParams(4);
- this.SetMaxParams(4);
Next you will define the type of each input parameter expected by the functoid. You can use this value to restrict the type of data your functoid should accept, for example a field, an element or another functoid type. More information about the ConnectionType Enumeraion here.
- // Add one line of code as set out below for each input param. For multiple input params, each line would be identical.
- AddInputConnectionType(ConnectionType.All); //first input
- AddInputConnectionType(ConnectionType.All); //second input
- AddInputConnectionType(ConnectionType.All); //third input
- AddInputConnectionType(ConnectionType.All); //fourth input
We use the ConnectionType Enumeration again to subsequently define the output type supported by the functoid.
- // The functoid output can go to any node type.
- this.OutputConnectionType = ConnectionType.All;
Finally in the last step of the configuration section you need to define the name of the function that will be called when this functoid is invoked in the mapper.
- // Set the function name that is to be called when invoking this functoid.
- // To test the map in Visual Studio, this functoid does not need to be in the GAC.
- // If using this functoid in a deployed BizTalk app. then it must be in the GAC
- SetExternalFunctionName(GetType().Assembly.FullName, GetType().FullName, "RESTConsume");
At this point you are now ready to write down the real function that will be implemented by the functoid. This function name should be the same one defined previously in SetExternalFunctionName.
For this example I used a function that consume REST services. It receives four string parameneters:
- URI of the service
- HTTP method used (GET, POST, DELETE, PUT)
- Timeout of the call in milliseconds
- Request message to be sent to the REST service
Once the service has been consumed the function returns the corresponding response.
- public string RESTConsume(string uri, string method, string timeout, string messageRequest)
- {
- try
- {
- bool error = false;
- string response = "";
- WebRequest webRequest = WebRequest.Create(uri);
- ((HttpWebRequest)webRequest).UserAgent = @"Mozilla/5.0 (Windows; Windows NT 6.1) AppleWebKit/534.23 (KHTML, like Gecko) Chrome/11.0.686.3 Safari/534.23";
- webRequest.ContentType = @"text/xml;charset=""utf-8""";
- webRequest.Method = method;
- if (timeout == "") webRequest.Timeout = 300000;
- else webRequest.Timeout = Int32.Parse(timeout);
- byte[] bytes = Encoding.ASCII.GetBytes(messageRequest);
- Stream os = null;
- StreamReader sr = null;
- if (method == "POST" || method == "PUT")
- {
- try
- { // send the Post
- webRequest.ContentLength = bytes.Length; //Count bytes to send
- os = webRequest.GetRequestStream();
- os.Write(bytes, 0, bytes.Length); //Send it
- }
- catch (WebException ex)
- {
- error = true;
- }
- finally
- {
- if (os != null)
- {
- os.Close();
- }
- }
- }
- if (error == false && method != "PUT")
- try
- { // get the response
- WebResponse webResponse = webRequest.GetResponse();
- if (webResponse != null)
- {
- sr = new StreamReader(webResponse.GetResponseStream());
- response = sr.ReadToEnd().Trim();
- }
- webResponse.Close();
- }
- catch (WebException ex)
- {
- error = true;
- }
- finally
- {
- if (sr != null)
- {
- sr.Close();
- }
- }
- return response;
- }
- catch (Exception ex)
- {
- return "";
- }
- }
You are ready now to test the functoid. Just remember to define a strong name key for your project and add the compiled assembly to the GAC using gacutil.exe
Testing the functoid
In order to test your new functoid you need to perform this two actions:
1) Copy the functoid assembly to the C:\Program Files (x86)\Microsoft BizTalk Server 2010\Developer Tools\Mapper Extensions folder
2) Use gacutil.exe to register the functoid assembly in the GAC, otherwise you’ll receive an error like this when testing the map:
Could not load file or assembly ‘BizTalk.MapperExtensions.RESTFunctoids, Version=1.0.0.0, Culture=neutral, PublicKeyToken=b4cf5e060283c1d7’ or one of its dependencies. The system cannot find the file specified.
Once the assembly is copied and registered in the GAC you can create a new map and add the functoid to the toolbox. Right click in the toolbox window and select Choose items…
In the Choose Toolbox Items window click on BizTalk Mapper functoids and select your functoid name
Now you should see your functoid displayed in the toolbox.
For this example I created another functoid to extract a xml part using XPath so I could access specific information in the response generated by the REST service.
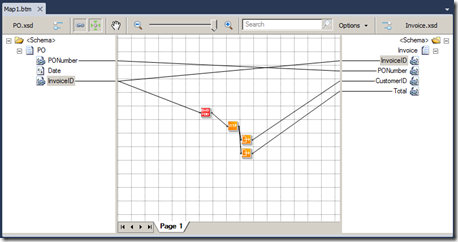
The map I created to test my functoids performs the following actions:
1) Receives a purchase order xml file.
2) Copies the PONumber and InvoiceID values from the incoming to the outgoing message.
3) Concatenates the the InvoiceID value to the REST service URI (http://www.thomas-bayer.com/sqlrest/INVOICE/) and the invokes it using the Consume REST functoid.
4) From the REST service response extracts the CusstomerID and Total values using the XPath Extractor functoid.
Once the map is tested you can see the CustomerID and Total values have been correctly extracted from the REST service response and copied to the output message.
Conclusion
BizTalk 2010 functoid creation is now easier than ever thanks to the Custom Functoid Item Template for Visual Studio 2010 developed by Sandro and his team! Now you can focus on the functionality of the functoid above anything else.
I have created a Codeplex Project for the RESTFunctions project explained in this post, feel free to download it and try it in your own implementations and tell me what do you think about it.
Entry filed under: BizTalk. Tags: BizTalk 2010, Functoids, Mapper, REST, Service, Visual Studio 2010.
2 Comments Add your own
Leave a comment
Trackback this post | Subscribe to the comments via RSS Feed


1. Distributed Weekly 162 — Scott Banwart's Blog | July 6, 2012 at 6:52 am
[…] How to create a custom BizTalk 2010 functoid using the Item Class Template for Visual Studio 2010 […]
2. omarsl | July 19, 2012 at 8:02 am
Although this might be an easier way of creating custom functoids I will always prefer custom XSLT and EXSLT (supported on multiple platforms) which will make maps more readable and interoperable!